Light basics
Illumination is one of the most critical components of a machine vision system. The selection of the appropriate lighting component for a specific application is very important to ensure that a machine vision system performs its tasks consistently and reliably.
The main reason is that improper illumination results in loss of information which, in most cases, cannot be recovered via software. This is why the selection of quality lighting components is of primary importance: there is no software algorithm capable of revealing features that are not correctly illuminated.
To make the most appropriate choice, one must consider many different parameters, including:
- Lighting geometry
- Light source type
- Wavelength
Surface property of the material to be inspected or measured (e.g. color, reflectivity)
- Item shape
- Item speed (inline or offline application)
- Mechanical constraints
- Environment considerations
- Cost
Since many parameters must be considered, the choice can be difficult and sometimes the wisest advice is to perform feasibility studies with different light types to reveal the features of interest. On the other hand, there are a number of simple rules and good practices that can help select the proper lights and improve the image quality.
For every application, the main objectives are the following:
- Maximizing the contrast of the features that must be inspected or measured
- Minimizing the contrast of the features of no interest
- Getting rid of unwanted variations caused by:
- Ambient light
- Differences between items that are non-relevant to the inspection task
Light in machine vision
In machine vision, light is mostly characterized by its wavelength,
which is generally expressed in nm (nanometers). Basically light is
electromagnetic radiation within a certain portion of the
electromagnetic spectrum: it can be quasi-monochromatic (which means
that it is characterized by a narrow wavelength band, i.e. with a single
color) or white (distributed across the visible spectrum, i.e. it
contains all colors).

Light visible to the human eye has wavelengths in the range of 400-700 nm, between the infrared (with longer wavelengths) and the ultraviolet (with shorter wavelengths): special applications might require IR or UV light instead of visible light.
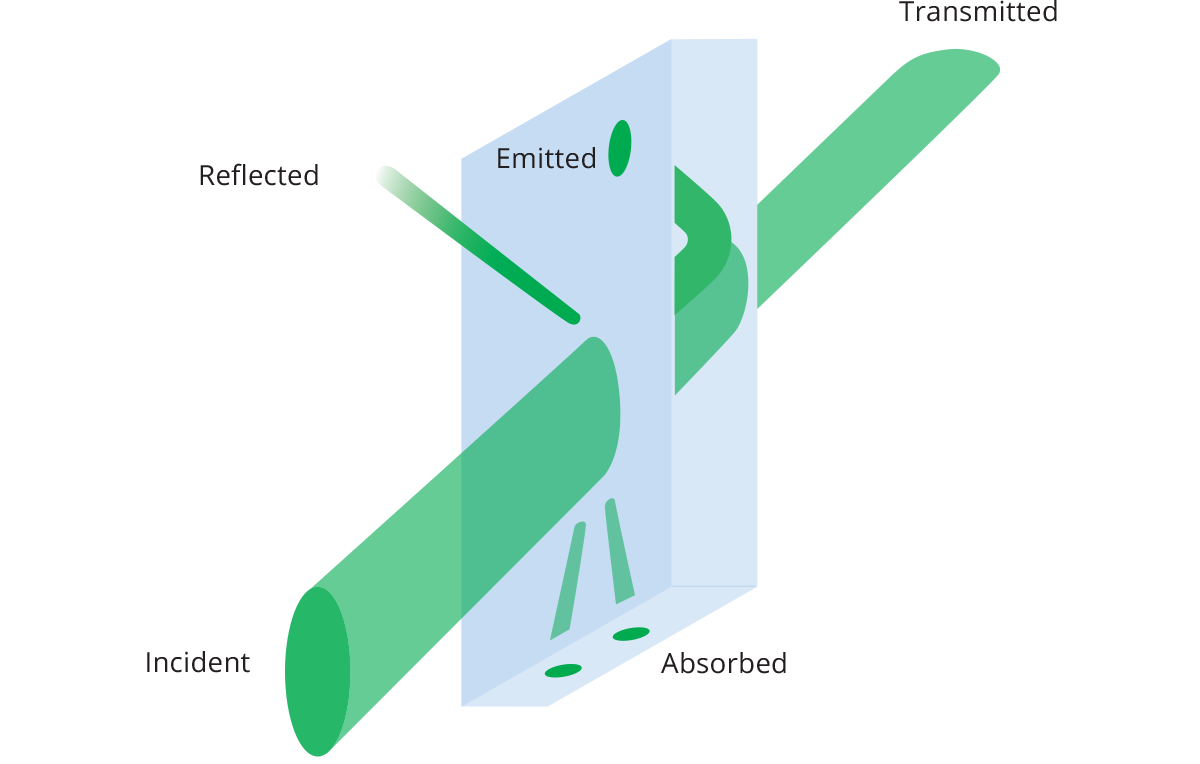
Basically, light interacts with materials by being
- Reflected and/or
- Transmitted and/or
- Absorbed
Additionally, when light travels across different media it refracts, i.e. it changes direction. The amount of refraction is inversely proportional to the light wavelength; i.e. violet light rays are bent more than red ones. This means that light with short wavelengths gets scattered more easily than light with long wavelengths when hitting a surface and is therefore, generally speaking, more suited for surface inspection applications.
In fact, if we ideally consider wavelength as the only parameter to be considered from the previous list, blue light is advised for applications such as scratch inspection while longer wavelengths such as red light are more suited for enhancing the silhouette of transparent materials.
LED illumination
There are many different types of light sources available including the following:
- Incandescent lamps
- Fluorescent lamps
- LED lights
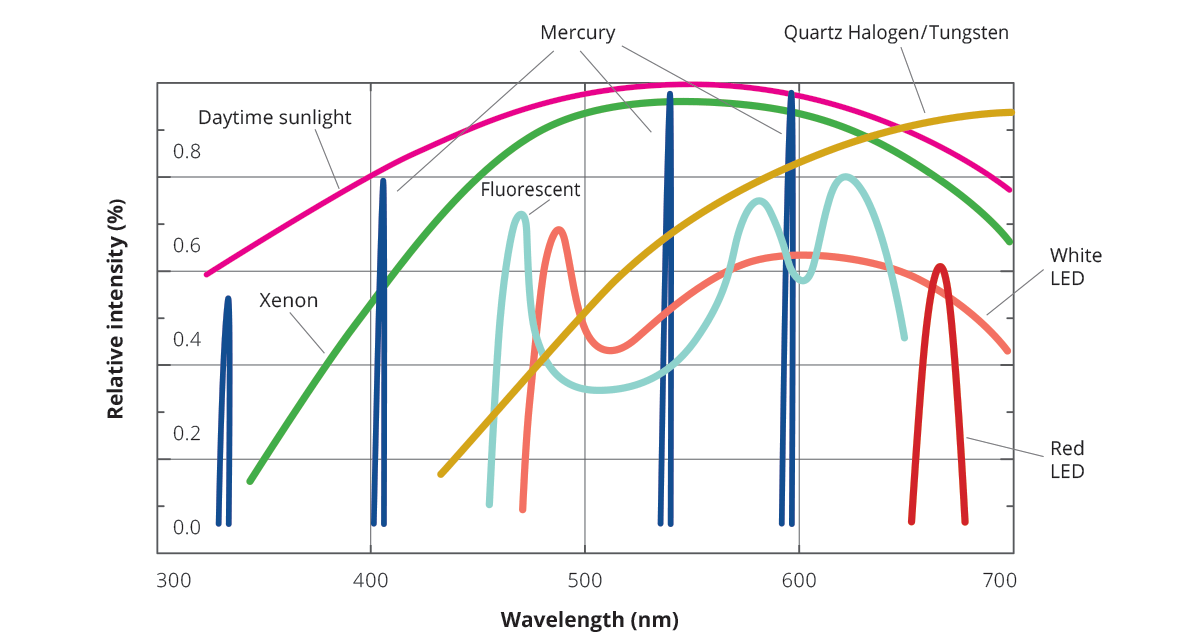
Incandescent lamps are the well-known glass bulbs filled with low pressure, inert gas (usually argon) in which a thin metal wire (tungsten) is heated to high temperatures by passing an electric current through it. The glowing metal emits light on a broad spectrum that goes from 400 nm up to the IR. The result is a white, warm light (corresponding to a temperature of 2870 K) with a significant amount of heat being generated.
Fluorescent lamps are vacuum tubes in which UV light is first produced (by interaction between mercury vapor and highly energetic electrons produced by a cathode) and then is adsorbed by the tube walls, coated with fluorescent and phosphorescent material. The walls then re-emit light over a spectrum that again covers the whole visible range, providing a “colder” white light source.
LEDs (Light Emitting Diodes) produce light via the annihilation of an electron-hole pair in a positive/negative junction of a semiconductor chip. The light produced by an LED depends on the materials used in the chip and is characterized by a narrow spectrum, i.e. it is quasi-monochromatic.
A general guideline for computing the peak wavelength of a LED is the following:
With:
- λ the peak wavelength
- Egap the energy gap of the semiconductor material
For example, for obtaining a green LED (λ = 555 nm), a semiconductor with an energy gap of about 2 eV has to be used (for example: GaAlP semiconductor).
White light is produced as in the fluorescent lamps, where the blue
light is absorbed and re-emitted in a broad spectrum slightly peaked in
the green region.
LED lights are by far the most commonly used in machine vision because they offer a number of advantages, including:
- Fast response
- Suitable for pulse and strobe operations
- Mechanical resistance
- Longer lifetime, higher output stability
- Ease of creating various lighting geometry
LED white light
LEDs are not natural sources of white light: they emit almost monochromatic light.
There are two main ways of producing white LED light:
- Combining multiple monochrome LEDs (e.g. red, green and blue) to create an RGB system and obtain white light
- Applying a yellow phosphorus coating over the die of an LED with a short wavelength (blue or UV), obtaining white light from the sum of blue and yellow.
The second method is the most popular one, as allows for greater efficiency and a better color rendering compared to an RGB system. To obtain different color temperatures, you can vary the wavelength of the LED, the composition and the thickness of the phosphorus coating.
The choice to use white light in imaging applications should be limited to cases where a true chromatic response is really needed, obviously along with a color camera.
In all other cases, the use of white light affects the performance of the optical system, due to the chromatic aberrations that are inevitably generated and due to the loss of resolution of color sensors.
LED power supply and output
An LED illuminator can be controlled by either setting the voltage V across the circuit or by directly feeding the circuit with electric current I.
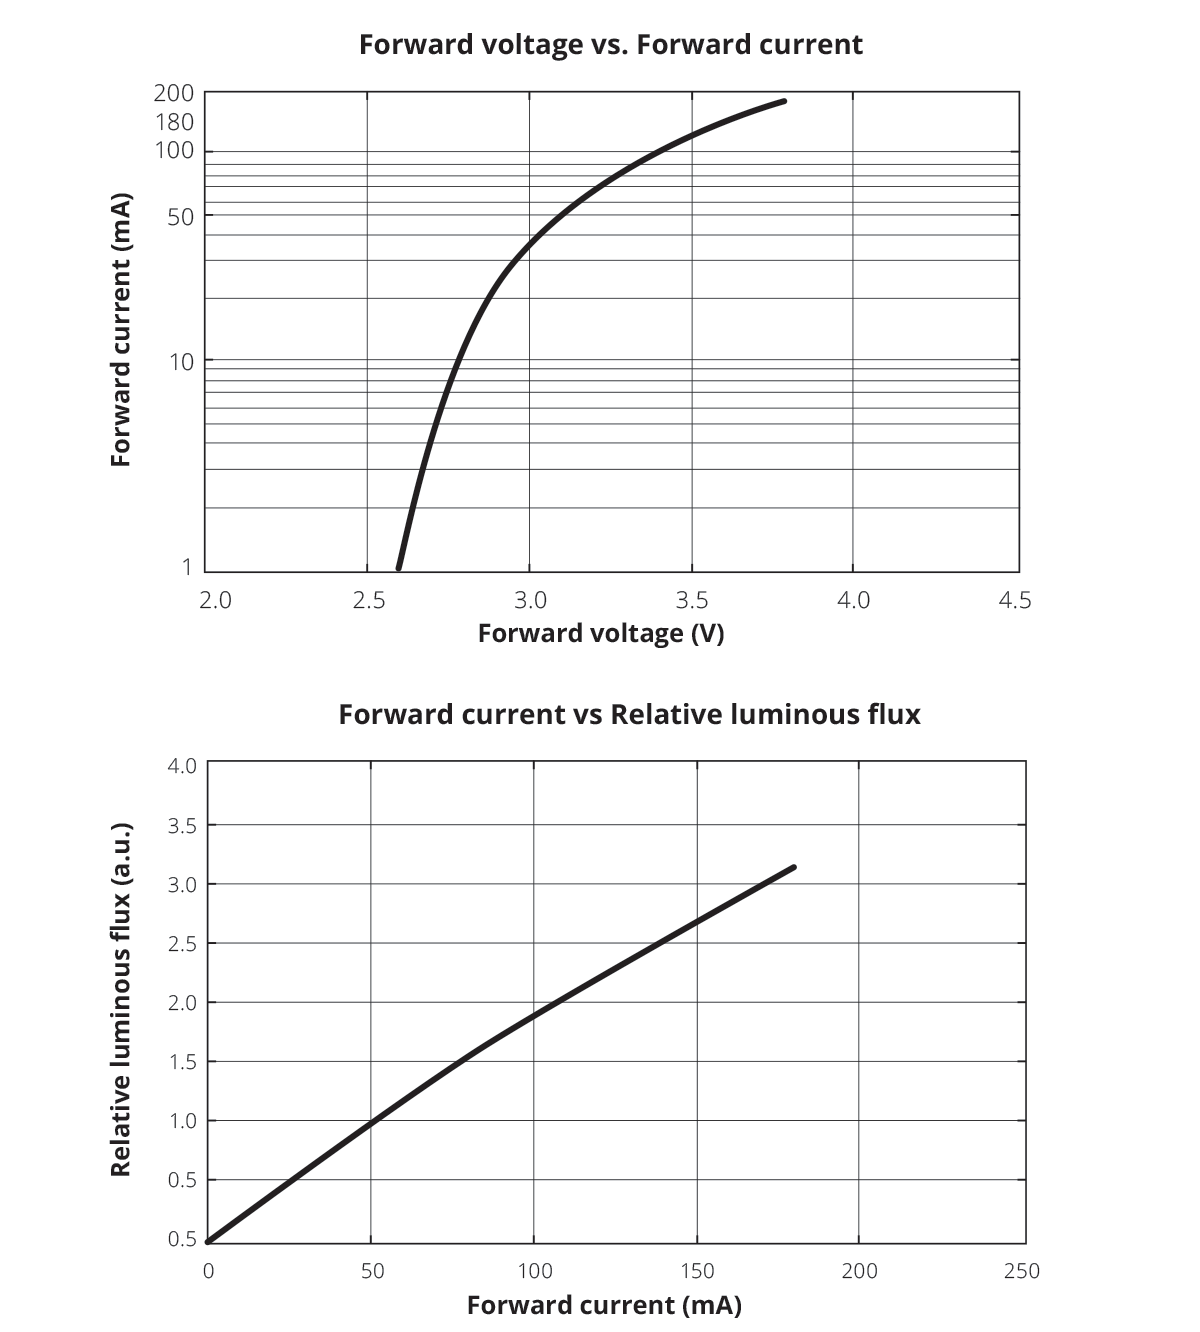
One important consideration is that the luminous flux produced by a single LED increases almost linearly with the current while it does not do so with respect to the voltage applied: 1% uncertainty on the driving current will translate into 1% luminance uncertainty, while 1% uncertainty on the input voltage can result in a several percentage points variation (see picture). For this reason, it is suggested to directly regulate the current and not the voltage, so that the light output is stable, tightly controlled and highly repeatable.
For example, in measurement applications, it is paramount to obtain images with a stable grey level background to ensure consistency of the results: this is achieved by avoiding light flickering and ensuring that the LED forward current of the telecentric light is precisely controlled.
LED pulsing and strobing
LEDs can be used to make continuous light, keeping constant the current flowing through the device.
On the other hand, LEDs can be easily driven in a pulsed (on/off) regime and can be switched on and off in sequence, turning them on only when necessary.
Usage of LEDs in pulsed mode has many advantages:
- Extension of their lifespan.
- Reduction of the power dissipation.
- Reduction of the generating heating.
If the LED driving current (or voltage) is set to the nominal value declared by the LED manufacturer for a certain amount of time and then is reset to zero, we talk about pulsed mode: the LED is simply switched on and off.
LEDs can also be driven at higher intensities (i.e. overdriven) than the nominal values, thus producing more light but only for a limited amount of time: in this case we say that the LED is operated in strobed mode.
Strobing is needed whenever the application requires an increased amount of light to freeze the motion of fast moving objects, in order to eliminate the influence of ambient light, to preserve the LED lifetime and to synchronize the ON time of the light (ton) with the acquisition time of the camera and item to be inspected.
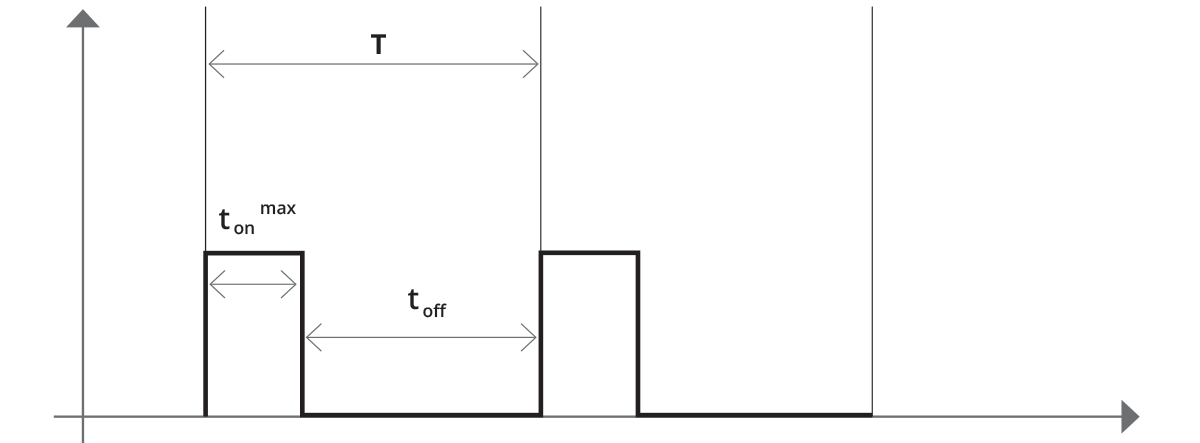
To properly strobe an LED light, a few parameters must be considered (see figure):
- Max pulse width or ON time (ton): the maximum amount of time for which the LED light can be switched on at the maximum forward current.
- Duty cycle D is defined as (usually expressed in %):
Where toff is the amount of time for which the LED light is off and T = ton+toff is the cycle period. The duty cycle gives the fraction in % of the cycle time during which the LEDs can be switched on. The period T can be also given as the cycle frequency f = 1/T, expressed in Hertz (Hz).
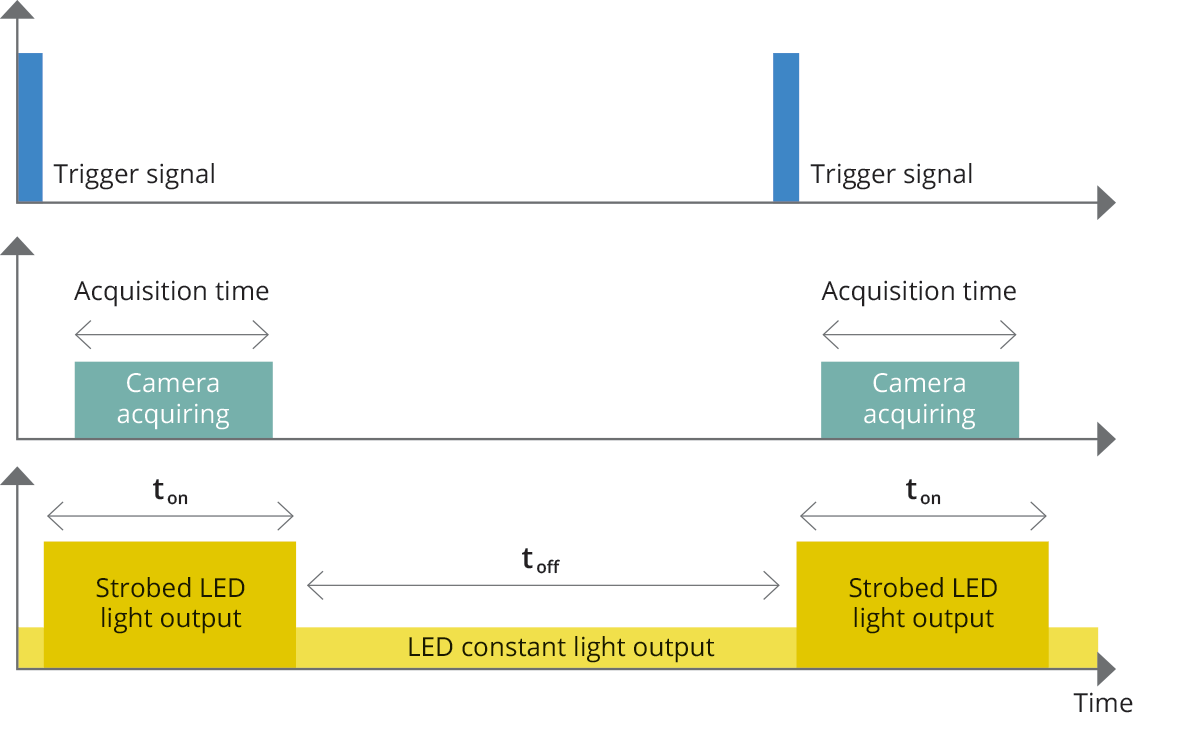
How to determine the maximum ton for different strobing frequencies?
The key point in driving the LED in strobed mode is not to overcome the maximum power rating of the LED. The power dissipated by the device is expressed by the following equation:
This equation is easily computable when dealing with continuous light illumination. On the other hand, when the LED is strobed, the turn-on and turn-off times must be taken into account. Typically Opto Engineering illuminators are delivered with all the LED strobing characteristics (see figure).
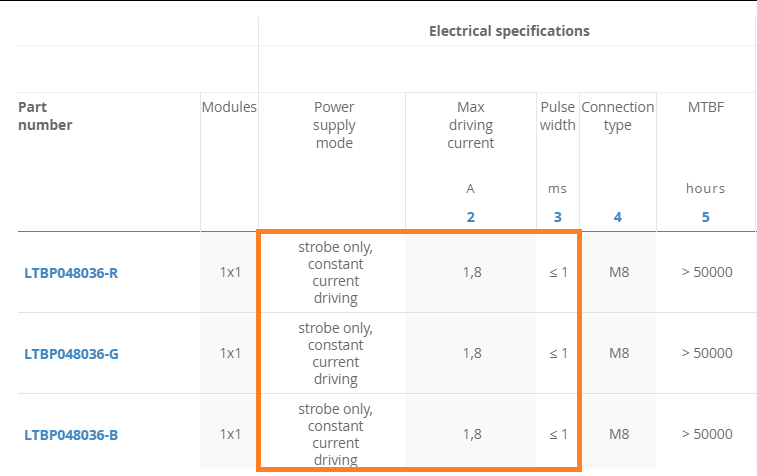
For example, considering the LTPB illuminator shown in the figure above, the maximum driving current is 1.8 A and the maximum ton time is equal to 1ms when strobing at 15 Hz. In this case the maximum average current of the LED is equal to:
Remembering that the strobing frequency is:
the current can be computed as:
Or, in another way, using the definition of duty cycle D:
Substituting the maximum driving current, the on-time and the strobing frequency, we obtain:
This current MUST NOT be exceeded when using this illuminator.
If, for example, we want to strobe at 30 Hz (double with respect to the previous frequency), it is mandatory to reduce the on-time to 0.5 ms (half of the previous on-time), so that the product of the maximum driving current (1.8 A) with the new two data (30 Hz and 0.5 ms) doesn’t exceed the value of 27 mA.
In summary, the advantages and the disadvantages of strobing LED sources are the following:
ADVANTAGES |
DISADVANTAGES |
A large amount of light can be obtained for a short period of time (mandatory for fast application) |
A light controller is necessary in order to strobe the LED source properly |
Increase the lifespan of the LED |
The synchronism between illumination and camera acquisition must be guaranteed |
Can reduce the power dissipation |
LED lifetime
The life of an LED is defined as the time that it takes for the LED luminance to decrease to 50% of its initial luminance at an ambient temperature of 25°C.
Line speed, strobing and exposure time
When dealing with online applications, there are some important parameters that have to be considered. Specifically, depending on the object speed and image sharpness that is required for the application, the camera exposure time must be always set to the minimum in order to freeze motion and avoid image blurring. Additionally, black and opaque objects that tend to absorb instead of reflecting light, are particularly critical.
As an example, let’s suppose to inspect an object moving with speed vo using a lens with magnification m and a camera with pixel size p.
The speed of the object on the sensor will be m times vo:
Therefore the space travelled by the object xi during the exposure time t is xi = vi t. If this space is greater than the pixel size, the object will appear blurred over a certain number of pixels. Suppose that we can accept a 3 pixels blur: in other words, we require that
so that the camera exposure time t is required to be
For example, using p = 5.5 µm, m = 0.66, vo = 300 mm/s (i.e. a line speed of 10,800 samples/hr on a 100 mm FoV) we find a maximum exposure time of t = 83 µs. At such speed, the amount of light emitted by LED illuminator used in continuous mode is hardly ever enough - so that strobing the illuminator for an equivalent amount of time is the best solution.
Another parameter that we can adjust in order to get more light into the system is the lens F/#: by lowering the lens F/# we will gather more light; however, this will lower the depth of field of the system. Moreover, this might also lower the image quality since, in general, a lens performs better in the center and worse towards the edges due to lens aberrations, leading to an overall loss of sharpness. Increasing the camera gain is another way, however this always introduces a certain amount of noise, thus again leading to a degraded image where fewer details can be distinguished.
As a result, it is always a good practice to choose sufficiently bright lighting components, allowing you to correctly reveal the features of interest the inspected of object when used in combination with lenses set at the optimum F/# and without the need to digitally increase the camera gain.
